

|
|
PCBAmiga, track functions. By Lee Davison. |
|
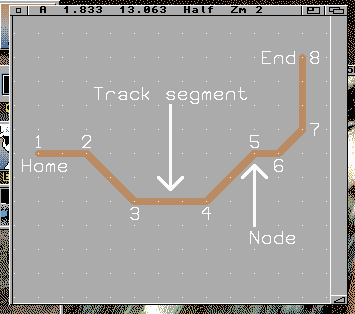
Each track can be thought of of a number of points, or nodes, joined by straight lines or segments. It is the lines that make up the track but the nodes that fix the position, layer and width of the track.The start of the track is the home node. This defines the point that all shift, repeat or flip functions work from. Next are the intermediate nodes and finally the end node. It is important to understand this as it is the nodes that are moved and changed to change the appearance of the segments when editing a track.
Starting new tracks.Editing tracks.This is for when you need to add a new track and either the hotkey [F2] or the menu can be used. From the Operation menu select New track, the program will then wait for you to position the cursor and click the left mouse button before starting the track. If you use the hotkey the track will start immediately.Editing existing tracks.If you wish to edit a previously placed track then either the hotkey [F1] or the menu can be used. From the Operation menu select Edit track, the program will then wait for you to position the cursor and click the left mouse button before selecting a track. If you use the hotkey the program will select a track immediately.You should remember that tracks are fixed by their nodes so you will need to place the pointer near a track node and not halfway along a segment.
You will now be in track mode. If rubberbanding is on then one or two lines will be displayed to show you where the next segment(s) of track will lie.
To continue the track just move the pointer to where you want the track to go and click the left mouse button or press [RETURN].
To exit track mode, and end the track, either click the right mouse button or press escape. Before you do that though you may like to try some of the other track commands available.
Track navigation.Other track functions.You do not need to be at the end of a track to edit it. It is possible to move about the entire length of any track using the following commands.Home.Makes the home node (node 1) the current node. Select either via menu Track Home or by hotkey [h].Back.Makes the preceding node the current node. Select either via menu Track Back or by hotkey [b].Next.Makes the succeding node the current node. Select either via menu Track Next or by hotkey [n].End.Makes the last node the current node. Select either via menu Track, End or by hotkey [e].
Changing track width.Track width.Changing track layer.There are eight different track widths available each of which can be assigned an actual width in the range 2 to 531 thousandths of an inch. This assignment can be changed via the Draw prefs menu. You can change the width of either the whole track and the subsequent track segments, or just the subsequent track segments you will place.All width.To change the width of the whole track use the Track, All width menu or use the hotkey, [źw], and then select the width.Seg width.To change the width of the next, and all subsequently placed, track segment(s) you need to use either the Track, Seg width menu or the hotkey, [w], and then select the width. This is particularly usefull to route a narrow track between two pads.Changing layers.There are up to eight copper layers and two silk layers available for track placement. You can change the layer of either the whole track and the subsequent track segments, or just the subsequent track segments you will place.All layer.To change the layer of the whole track use the Track, All layer menu or use the hotkey, [źl], and then select the layer.Seg layer.To change the layer of the next, and all subsequently placed, track segment(s) you need to use either the Track, Seg layer menu or the hotkey, [l], and then select the layer.If auto via is active when you change the segment layer then a via pad will either be automatically placed or you will be asked if the pad should be placed.
Track angle.When you are drawing a track you can have the program automatically generate either 90 or 45 degree track angles. This can be selected from the Track, angle menu.Track flip.When you are drawing a track with the angle set to either 45 or 90 degrees the angle formed will sometimes be the wrong way round this can be changed by selecting the Track, Flip menu or by using the [f] hotkey.Track invert.This function reverses the sequence of nodes along a track. It is usefull if you wish to extend a track from it's start.Arc/circle.To create a track circle start a new track at any convinient point where the circumference will be. Now click on where you wish the centre to be. (Make sure the track is only two nodes long, you may have to select Track, angle, multi to achieve this.)Now select Track, Arc/circle, or use the hotkey [źa], and the circle will be created. To create an arc simply delete segments from the circle.
If you wish to create the circle centre first then procede as above but clicking on the centrefirst then the circunference and simply invert the track (menu Track, invert or hotkey [i]) before selecting Arc/circle.
| Last page update: 13th August, 2003. |
e-mail me
 |